PROJECT OVERVIEW
- WORKING TIME: 1 – 2 hrs
- TOTAL TIME: 2 – 4 hrs
- SKILL LEVEL: Beginner
- ESTIMATED COST: $10 to $100
The walls in your home see their fair share of abuse. Between kids, pets, and the general wear and tear of everyday life, scrapes and smudges are bound to emerge. However, there might not be enough of these ugly marks to justify repainting the whole wall. When that’s the case, a touch-up paint job might be the solution.
Touch-up painting might sound simple, but failing to use the right tools and techniques can result in unsightly blotches that stick out just as much as the blemishes they’re meant to cover. If your wall could use a facelift, read on to learn the correct way to touch up paint.
FEATURED VIDEO1 second of 15 secondsVolume 0%This ad will end in 4 5 Things You Can Transform with Just Spray Paint
Before You Begin
In order for your touch up paint to blend seamlessly into the surrounding wall, you need to use the same—or as similar as possible—paint and paint applicator (rollers and brushes) that were originally used to paint the wall. Ideally, you will have some leftover paint and applicators from when the wall was first painted. If not, you will have to find a matching paint with the same color and sheen. You can find a matching paint with:
- Paint matching smartphone apps: There are several free smartphone apps that can match the color of your wall with a compatible paint. While this option is the most convenient, it may not yield the most accurate results.
- Color matching technology: Several hardware stores and paint suppliers use a spectrometer analysis to determine the color and sheen of your wall’s paint. To use this service, you need to bring in a sample of the paint you want to match. This sample is usually a physical piece you take from the wall, like a 1-inch square you cut from the drywall with a utility knife. Some stores might be able to analyze a picture taken with your phone, but that may not be as accurate as a physical sample.
If you’re not sure what type of applicator was used, rollers are often considered the best option for touch-up painting. Smaller rollers are usually recommended since they offer the highest level of control and precision.
Safety Considerations
Exposure to paint fumes can cause dizziness, vision problems, eye and lung irritation, and headaches.1 To combat these risks, work in an area with adequate ventilation by opening any windows and exterior doors in the room. You may also consider using a fan to direct the fumes outdoors, and/or wearing a face mask or respirator.
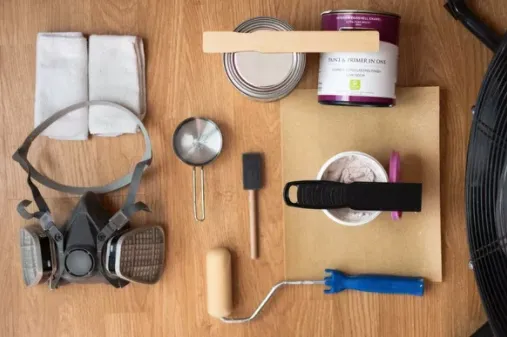
What You’ll Need
Equipment / Tools
- Paint applicator: small brush or “weenie” roller
- Small foam brush
- Putty knife
- Dry rag
- Damp rag
- Fan (optional)
- Face mask or respirator (optional)
Materials
- Paint
- Interior-grade latex primer
- Spackling compound
- 120-grit sandpaper
- Paint thinning agent: water, turpentine, or mineral spirits
- Paint mixer: mixing stick or power drill mixer attached to power drill
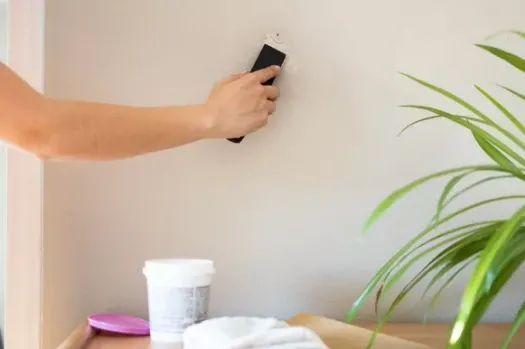
1. Prep the Area
Before you begin painting, the wall needs to be free of dirt, holes, gouges, and other blemishes that can prevent the paint from adhering to the wall.
Start by cleaning the wall with a damp sponge. Dry with a clean rag. Continue cleaning the area until there’s no trace of dirt, grease, or grime.
Next, fill in any small holes, gashes, or gouges with spackling compound. Start by knocking down any rough surfaces with 120-grit (or finer) sandpaper and wipe off residual drywall dust with a damp rag.
Load the end of a putty knife with spackle and smear it over the spot until it’s completely full. Once the spackle has dried, use a fine grit sandpaper to smooth out the spackle until it’s flush with the rest of the wall. Clean off residual drywall and spackle dust with a damp rag.
2. Prime the Area
Applying a light coat of interior-grade latex primer can help the touch-up paint blend into the surrounding wall, and will promote better paint adhesion. Use a small brush to prime the area you prepped in the previous step and be careful not to paint too far past the area you’re touching up.

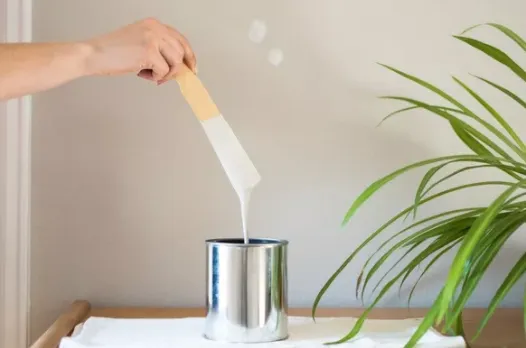
3. Prepare the Paint
Thoroughly mix the can of paint to properly blend all the pigments and binders. You can manually mix the paint with a mixing stick, or use a power drill mixer attached to a power drill.
You may also consider thinning the paint to help it blend into the wall. As a general rule, latex paint should be thinned by adding enough water to make up 5 to 10 percent of the paint’s volume, and oil-based paints should be thinned with the same quantity of turpentine or mineral spirits. Refer to the specific thinning instructions provided by the manufacturer of the paint you’re using. Thinning paint will lighten the paint color slightly—test a small area for color matching before proceeding.
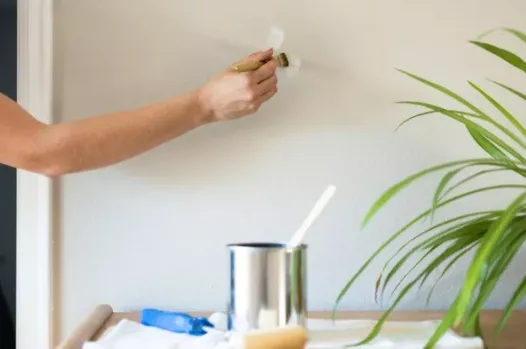
4. Apply Paint
Load your brush or roller with just enough paint to cover the touch-up area.
Start in the middle of the touch-up spot, and work your way out to the edges. Without reloading the applicator, feather the edges by making light strokes that extend slightly past the edge onto the surrounding wall. Feathering creates a less noticeable transition between the new and old paint, which will help the touch-up spot blend into the wall.
For areas under an inch in size, use a small foam brush to lightly dab paint onto the spot.
Original article HERE
By James Fitzgerald for The Spruce 10/21/21
For more information, please contact us here.